Friday, February 24, 2017
Awesome PDF creator software | Free Download

Awesome PDF creator software | Free Download
Download The FREE PDF device and make PDF files from any
application with PDF Creator. Better of all, PDF Creator is completely free for
anyone to use.......


Sunday, February 5, 2017
HOW TO CREATE RESTORE POINT IN YOUR COMPUTER(WINDOWS 10)

Having your laptop compromised in any method are often damaging and cause lots of stress for you. Easy tasks like installing a new application, driver, or update will produce problems along with your pc, and you'll need to undo the changes you created to revert your laptop back to normal. This is where making a restore purpose in Windows ten can be helpful for you.
Restore point permits you to primarily save a ‘snapshot’ of your pc at a given moment that is then hold on as a restore point. If your pc someone starts operating awkwardly or becomes leggy, you'll then revert to the present restore point that you simply saved and your computer can return to however it absolutely was at that point.
Essential OF CREATING RESTORE POINT IN
Most folks had encountered a tangle here or there with Windows before and needed that we have a tendency to might undo changes and convey back our computer to however it absolutely was before. By making a restore point on a Windows computer, you'll effectively bring back your laptop to a antecedently saved state if you think that its current state is compromised.
So you're essentially going back in time to however things once were rather than your computer operating in its current capability that you are sad with. It ought to be noted that if you have got put in any programs when a restore purpose has been created, that after a restore is performed those programs won't be there any longer.
HOW TO CREATE RESTORE POINT
IN
Step 1: Open up Control Panel on your laptop. you'll be able to access it by either victimization your computers intrinsically search operate, through quick Access Menu, or by Using Cortana.

Step 2: Open up the System and Security
section and so click on System. Then from the left pane click on System
Protection.

Make sure that the Windows
Drive
Step 3: Click on the Create button to form a system restore point. You'll be able to write an outline in order that you'll be able to bear in mind in future why this restore point is very important to you.
Step 1: Open up Control panel on your laptop as mentioned on top of.
Step 2: move into the ‘System and Security section’ then open up System Protection.
Step 3: Click on ‘System Restore’, and you may see a listing of obtainable restore points to settle on from.
Step 4: Click on Next then Finished to start a system restore.
That is it of us, you simply learned the way to produce a restore point on your laptop. If you are doing not have restore point created already, then you must move and build one just. You ne'er grasp once a program or system files will create your pc behave adore it is sweet for nothing.
Having a
Restore purpose will facilitate windows users Associate in Nursing you
usually have an choice to take your laptop back in time once your System was
operating like butter.
Friday, February 3, 2017
Adobe Photoshop CC 2017, new update

The most popular photo editor software Photoshop is updated.
The latest version is “Photoshop CC”Photoshop cc 2017 is now released. Adobe determined
to skip (2016) the previous update was called
2015.5, this totally makes sense.

Check out this video below, with my favorite new features
in the latest update to Adobe Photoshop cc .
Download This Software Please Click Download:

Tuesday, July 5, 2016
5 best Adobe Photoshop Tips and tricks for Beginners

Adobe Photoshop is a powerful photo designing platform. If you’re into any digital workplace, Adobe Photoshop learning can be a great help. Nowadays Photoshop is surely a centre of creativity to which almost every digital domain, from website designing to animation, from photography to digital magazine, is deeply connected. Today, when it comes to Photography, it is not possible to imagine it without Adobe Photoshop.
Best Adobe Photoshop skills can not make a middling picture perfect unless you’re into manipulation. However, it can surely help you to improve your best photo into an amazing masterwork. Learning Adobe Photoshop is a slow process, and you should try it with more practice, after all it is a digital painting.
Now I will walk you through some basic Adobe Photoshop retouching skills. Here 5 easy Adobe Photoshop tips for beginners that will increase your productivity overnight.
01. Learning Keyboard Shortcuts
Learning key shortcuts will assist you to speed up your processing workflow. There’re some keyboard shortcuts for different tools in the tool bar. Some most widely used keyboard shortcuts are:

1. V = move tool
2. F = toggles through display screen modes
3. Space bar = temporary hand key
4. B = paintbrush tool
5. D = sets the foreground/background colors to default
6. X = swaps between background and foreground color
7. E = eraser tool
8. S = stamp or cloning tool
9. W = quick selection tool
10. Ctrl+j = duplicates the selected layer
There are some most regularly used Photoshop shortcuts. When you begin using the program more, your keyboard shortcuts knowledge will gradually increase. One time you are conscious of the most used shortcuts retouching pace will be quicker than ever.
02. Color Enhancing, Saturation versus Vibrancies

Color is a different domain you can try while enhancing your photographs. Normally when you’re starting in photography, enhancing the color of every picture looks fine, as if the colors are talking out of the photographs. It will be more useful if you can understand the dissimilarity between how saturation and vibrancies works. Go to picture menu and select adjustment under the menu.
As shown in the picture to the right, choose the Vibrancies option. You’ll get two options under the menu bar, vibrancies and saturation. Vibrancies increase the Saturation of less saturated colors. This option keeps away from yellow and orange skin tones. Basically vibrancies works best for portraits.

On the other hand, Saturation increases the power of all the colors in your picture equally. This may not be a best option for portraits or peoples pictures. What I can Suggest is this, slowly start with vibrancies for the color enhancement and use Saturation later if you would lilke to pump up the color more.
If you compare the two pictures below, you’ll understand how vibrancies is only responsible for rising the intensity of less saturated colors, where as saturation raises the intensity of all colors equally.


03. Adding a Vignette

Vignette is a technique to darken the edges of your frame so that the eyes move to the subject simply. This process works best when you’ve a subject in the center. Our eyes tend to move towards the brighter part of the picture and move away on the darker side. This system will result in dark space around the subject.
There’re lots of manual ways you can add vignette in your pictures but I will speak about how to easily add vignette in your images via Adobe Photoshop. Go to Filters menu at the top and choose "lens correction", then select the Custom Tab on the right. The 3rd section down is for adding a vignette. Slide the amount to the left to darken, and middle to adjust the size of the circle.

04. Adding Sharpness and Details

Adding sharpness is a different method for beginners in Adobe Photoshop. This will make your picture look more detailed. I would recommend detailing most of your pictures with appropriate values. But make sure you sharpen or detail your pictures with a small value if you’re going to upload pictures on Facebook because it compresses the pictures and adds some details to build it took a bit sharper. So when an already sharpened picture is uploaded in Facebook, there is a change of it looking too edgy.
Like any other method, there are many ways you can add details in Adobe Photoshop. I will show you a very easy method. Once you understand how this works you can experiment with some of the other methods.

2. Step 2: Open the High Pass filter- Filter > Other > High Pass on the top layer
3. Step 3: Apply an appropriate value (just to see the edges in the image) and click ok
4. Step 4: Change the blending mode of the top layer to overlay
5. Step 5: Adjust the opacity of that layer to your taste

(Layer blend mode)
5. Photoshop Filter Gallery

Filters are basically automatic effects that you apply to your pictures with a few clicks. Filters can help you to achieve certain special looks or effects. There’re various filters in Adobe Photoshop, which you can choose individually, each filter results in another effect when applied to different pictures. You an also apply more than one and stack them. Though I do not use filters much, it is good to explore if you’re just starting out in Adobe Photoshop. Later, when you’re more known with advanced tools and techniques you can try to create the related effect from manual options and controls.
To apply a filter pick the layer and go to Filter>Filter Gallery. When you apply any filter in the gallery make sure to change your picture to 8 bit. You can do that by going to picture > Mode > 8 bits/channel.

I hope these 5 basic Adobe Photoshop tips will help you to retouch and enhance your pictures. If you’ve others suitable for learners please share in the comments below.
tHaNkS
Thursday, June 23, 2016
15 Photoshop Tips and Tricks for Beginners
Hi guys! Today I publish 15 Photoshop Tips and trick that will increase your productivity overnight. Photoshop is an amazing photo editing software that can really help your creativity express itself through a variety of helpful tools. It is also brilliant if all you want to do is touch up a photo a bit before you post it on your site or anywhere else. If you are a beginner Photoshop designer, only recently exposed to the wonders of this advanced photo editing software, read on. We have gathered a few Photoshop tips and tricks that could truly make a difference as you move forward with your next few pictures.NOTE: The shortcuts are phrased for Computer users. Mac peoples, you know what to do with them.

1. Transform
When you would like to change the size of an image, flip or distort, rotate, you have to do so by clicking Edit, now click Transform and select the action you desire. To make life easier, there is a shortcut you can use. Just press Ctrl + T on your Computer keyboard and a bounding box will then appear around the image, representing transformation. This means now you can resize your image. The best method to do so is by placing the cursor on one of the rectangle corner and then dragging the corner while holding the shift key. When you are finished now press Enter and you are done.
To flip your image horizontally or vertically press Ctrl + T and then right click your mouse. A popup window will show with a few options for rotating and flipping the image. Select the action you want and when you are done then press Enter.

In the same way, to skew or distort the image press Ctrl + T and then place the cursor on one of the corners you want to distort. Press Ctrl key while holding your mouse down on the corner and dragging it down to wherever you want, then press Enter key to activate.

2. Change the Unit of Measurement
A quick and short way to switch between units of measurements is to place the cursor on one of the ruler {press Ctrl+R to show or hide the rulers}, and right click, then select a new unit from the context menu. You’ve a wide selection of units there, from centimeters to pixels, millimeters, points and even percents.

3. Magnetic Lasso Tool
Magnetic Lasso Tool is an easy selection tool that helps you trace and outline a part of an image, and to divide it from the rest of the image in order to perform certain actions. For example, you can select and divide a product from its background.
This tool detects the edges of an object, so this tool works best when you have a bold contrast between an object and its background with well defined edges. You can find Magnetic Lasso Tool in the tools panel.
To access the Magnetic Lasso Tool, click and hold your mouse click button down on the Magnetic Lasso Tool until a fly-out menu appears. The magnetic lasso tool is the last one with a small magnet on its icon. Select this tool and then go to your image and place your mouse on the edge of the part you want to select. Click the click button on your mouse once, release and now go over the edges of the object you want to select .

4. Magic Wand Tool
The Magic Wand Tool is another selection tool, ideal for when you are working with a photo background that is very monotone and reliable. If you’ve a clearly defined color that you would like to choose in an image, you have to take this tool. For example, the Magic Wand tool is great when you want to select a clear blue sky or a white background. Choose this tool from the tools panel and click on the part of the image you want to select. Confirm that you toggled the “add to selection” option on the top bar so you can keep on adding colors and tones to your selection.


Using this tool we deleted and selected Manhattans blue skyline
6.Custom Shape Tool
The Tool Panel offers all the basic shapes you need like square, circle, line, ellipse etc. However, if you would like to have extended options check out the custom shape tool. Represented by icon that kind of resembles a road kill the custom shape tool is easy to locate on the Options Bar. When you select it, a world of shape options will make known itself to you.
A shape preview thumbnail will show to the right of the Custom Shape Tool icon. The selection is greater and you can access even more shapes by clicking again on the small arrow on the right side of the panel. If you’re finding for banners, speech bubbles or arrows of all kinds, you have to take this tool.


7. Adjustment Layers
As you use the best photo editing software Photoshop for whatever purpose, like change colors of an image, improve the contrast or make it sharper, remember for all time use the adjustment layers. The large advantage of the adjustment layer is that you do not make the changes on the image itself but on a separate layer, so you can forever change the settings to see which adjustment works best for you. You will locate adjustment layers in the bottom of the Layers Panel {a black and white circle icon}.


Sharpen and improve your picture using Adjustment Layers
8. Layer Styles
This is a simple and easy way to add some pizzazz to your photo. Layer styles are special effects that can be rapidly applied to individual layers. All you have to do is double click on a layer and then decide the effect you like.
You can choose from a whole variety of features, add a stroke or a glow, drop a shadow, and much more with simply a click of the mouse. Be cautious you don not overdo it. These effects have a bent to appear low-cost and sleazy once there’s an excessive amount of them.
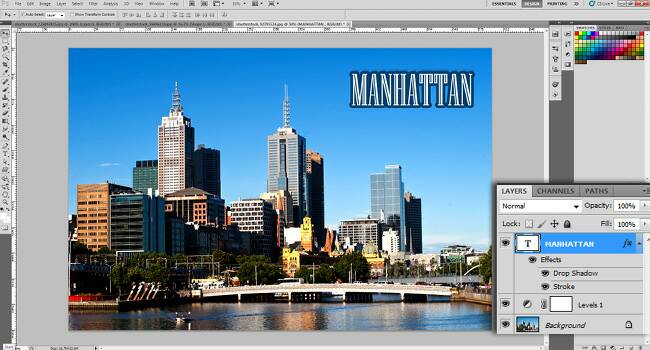
Easily add a stroke or drop a shadow on any text or object.
9. Spot Healing Brush
Yes, it is exactly like it sounds, spot healing brush tool will make everything look prettier! If you’ve a spot, blemish, or a mole spot healing brush tool will remove it instantly. This tool can also be used as a pimple remover. Just place the brush over the area you want to fix, confirm the brush is a bit bigger than the blemish and click. The best photo editing software Photoshop automatically samples from around the retouched area so you really do not need to do anything else.


Just simple click and the spot is gone
9. Dodge Tool
This tool lightens pixels where you use it. This is a best solution for red tired eyes. Set this tool to a soft brush, go to Range setting in the menu-bar’s pull down and choose highlights, set exposure on around 20%. Now carefully brush over the eye area. Remember do not overdo it, or your model will start to look like an Alien. A few easy strokes should do the job.

10. Blur Tool
An easy and delicate way to remove small wrinkles is to blur them a bit. Use the blur tool to smooth out small imperfections like the wrinkles around the eye or mouth area and simply blur them into the background. Again, be gentle and keep in mind that not to overdo it or instead of improving your image you’ll end up spoiling it. The Blur tool can be used for repair as well as more artistic purposes so it is important to become friendly with it.

Tuesday, June 21, 2016
30 Photoshop secrets tips that will increase your productivity overnight

If you've determined to give your best pencils a little have a rest and jump into digital art, you will more than likely need some photo editing software. Photoshop is an amazing photo editing software and a popular choice.This software used by thousands of designers worldwide on a daily basis. Photoshop is such a flexible bit of kit that you could spend two week learning new features, doing Photoshop tutorials and experimenting with Photoshop brushes and still have only broken the surface of what's possible.
1st you've overcome the beginners' learning curve, however, there are some real charms hidden inside it can help you speed up your work and get more out for less effort. Here we have round up 50 of the best Photoshop secrets to help power up your skills and develop your efficiency.
1. Control your panels

In the top right side corner of every panel is a small icon that reveals a fly-out menu, giving extra options that you might not have seen before. You can use this option to set your layer panel thumbnails to be larger, crop to art work and much more experiment.
2. Paste in Place
Paste in Place is one of those functions that you will use all the time if you know about it, but if you do not know it will come as a revelation! After you have made a selection either in your present document or in a 2nd document if you are combining artwork, copy as usual by choosing Edit > Copy, or by using the shortcut keys Ctrl+C (Windows) or Cmd+C (Mac).
When you are viewing the document you want to paste into, use the shortcut keys Ctrl+Shift+V (Windows) or Cmd+Shift+V (Mac).
3. Bird's Eye View
If you are doing total work such as cloning or edge refinement, it can be easy to lose sight of the larger picture. Equally, if you are working at a high zoom level, navigating around the document can become annoying when you need to get back to your high-level zoom.
With the Bird's Eye View feature, when zoomed in you can hold press the H key on your keyboard and click and drag with your mouse to temporarily zoom out to a bird's eye view. When you let go, you will zoom back in to the level you were working at.
4. Interactively set styles

Move the shadow around by clicking and dragging on the canvas
When you are adding a drop shadow layer style, move the dialogue box to any side. By clicking and dragging on the canvas you can use your computer mouse to interactively move the shadow around relative to the layer casting the shadow.
5. Repeat Transformations
When you have made a transformation to a layer or object using Edit > Transform, you can very quickly repeat that same transformation on another object or layer. Simply press, Ctrl+Shift+T on Windows or Cmd+Shift+T on a Mac and Photoshop will repeat the same transformation on the currently active layer.
6. Solo your layer

How to preview a single layer
If you would like to preview a single layer, you can rapidly get a look at it on its own by Alt+clicking on the layer's eye icon in the layers panel. Alt+clicking on the eye icon again will return to the previous layer visibility state. Note that if you unintentionally click on another layer's eye icon you will lose the ability to revert back to the previous state
7. Enable visibility history

Enable the layer visibility history
If you want to avoid such problem of losing layer visibility settings while previewing individual layers, you can mark a setting in the History Panel options dialogue box that will enable history state for layer visibility. When checked, you can use Cmd/Ctrl+Alt+Z to step backwards through your history as you always have, but you will discover changes to the visibility of layers is now included within that history.
8. Merge vector shapes

merge vector shapes
If you are lucky enough to have a photo editing software Photoshop CS6 at your disposal, you can merge two vector shapes together and keep the result as an editable vector. Just select the two shape layers and hit Cmd/Ctrl+E on your computer keyboard to merge them together. In previous versions this would have resulted in a raster zed layer, but Adobe updated the functionality for CS6.
9. Quickly finish editing text

Press Cmd+Return on your computer keyboard to finish editing text and move focus outside the text field
Once you are working with text boxes in Photoshop it can be annoying to move between tools as your shortcut keys won’t work. A great small secret tip is that you can press Cmd+Return on your computer keyboard to finish editing text and move focus outside the text field. This allows you to quickly select other tools using their shortcut keys as appropriate .
10. Organize your files properly
It is easy to become sloppy with the way you name and organize files. But if you have to hand over your work to others, this can bounce back on you, giving you a bad rep as people fight to work out what is going on. Go behind our advice on how to organize your files properly here.
11. Draw dotted lines with the brush tool

Drawing straight dotted lines with the brush tool
It is quite well known that you can use the square bracket keys and to change the size of your brush in Photoshop CS6. What you might not know is that if you hold down the Shift key while tapping these same keys, you can also affect the stiffness of the brush without having to visit the brush panel
13. Change around dialogue boxes
When you are using a dialogue box with a pair off buttons that read Apply/ OK and Cancel, it can be trying to undo changes you have made. Often you will want to hit Cancel and then again-open the dialogue. Many modal pop ups allow you to hold down the Alt/Opt key on your computer keyboard to change the cancel button to a Reset button, recurring the settings to how they were when you opened the dialogue.
14. Scrub values
One of the best time-saving features in photo editing software ‘Photoshop’ is the ability to scrub your mouse over input values. If you would like to change the opacity of a layer, for example, rather than click into the opacity field of the layers panel, take mouse click and drag on the value for opacity. A scrub to the left reduce the opacity; a scrub to the right increases it
15. Copy layer styles rapidly

If you have been using Photoshop CS6 for a while you will know you can copy a layer to a new layer by hold down Alt/Opt and dragging a copy of the artwork across the canvas. You can use this same deception for layer styles: simply holding down the Alt/Opt key and drag the FX icon in the layers panel from the layer with the styles to the target layer, the styles will be copied right over


