15 Photoshop Tips and Tricks for Beginners
Hi guys! Today I publish 15 Photoshop Tips and trick that will increase your productivity overnight. Photoshop is an amazing photo editing software that can really help your creativity express itself through a variety of helpful tools. It is also brilliant if all you want to do is touch up a photo a bit before you post it on your site or anywhere else. If you are a beginner Photoshop designer, only recently exposed to the wonders of this advanced photo editing software, read on. We have gathered a few Photoshop tips and tricks that could truly make a difference as you move forward with your next few pictures.NOTE: The shortcuts are phrased for Computer users. Mac peoples, you know what to do with them.

1. Transform
When you would like to change the size of an image, flip or distort, rotate, you have to do so by clicking Edit, now click Transform and select the action you desire. To make life easier, there is a shortcut you can use. Just press Ctrl + T on your Computer keyboard and a bounding box will then appear around the image, representing transformation. This means now you can resize your image. The best method to do so is by placing the cursor on one of the rectangle corner and then dragging the corner while holding the shift key. When you are finished now press Enter and you are done.
To flip your image horizontally or vertically press Ctrl + T and then right click your mouse. A popup window will show with a few options for rotating and flipping the image. Select the action you want and when you are done then press Enter.

In the same way, to skew or distort the image press Ctrl + T and then place the cursor on one of the corners you want to distort. Press Ctrl key while holding your mouse down on the corner and dragging it down to wherever you want, then press Enter key to activate.

2. Change the Unit of Measurement
A quick and short way to switch between units of measurements is to place the cursor on one of the ruler {press Ctrl+R to show or hide the rulers}, and right click, then select a new unit from the context menu. You’ve a wide selection of units there, from centimeters to pixels, millimeters, points and even percents.

3. Magnetic Lasso Tool
Magnetic Lasso Tool is an easy selection tool that helps you trace and outline a part of an image, and to divide it from the rest of the image in order to perform certain actions. For example, you can select and divide a product from its background.
This tool detects the edges of an object, so this tool works best when you have a bold contrast between an object and its background with well defined edges. You can find Magnetic Lasso Tool in the tools panel.
To access the Magnetic Lasso Tool, click and hold your mouse click button down on the Magnetic Lasso Tool until a fly-out menu appears. The magnetic lasso tool is the last one with a small magnet on its icon. Select this tool and then go to your image and place your mouse on the edge of the part you want to select. Click the click button on your mouse once, release and now go over the edges of the object you want to select .

4. Magic Wand Tool
The Magic Wand Tool is another selection tool, ideal for when you are working with a photo background that is very monotone and reliable. If you’ve a clearly defined color that you would like to choose in an image, you have to take this tool. For example, the Magic Wand tool is great when you want to select a clear blue sky or a white background. Choose this tool from the tools panel and click on the part of the image you want to select. Confirm that you toggled the “add to selection” option on the top bar so you can keep on adding colors and tones to your selection.


Using this tool we deleted and selected Manhattans blue skyline
6.Custom Shape Tool
The Tool Panel offers all the basic shapes you need like square, circle, line, ellipse etc. However, if you would like to have extended options check out the custom shape tool. Represented by icon that kind of resembles a road kill the custom shape tool is easy to locate on the Options Bar. When you select it, a world of shape options will make known itself to you.
A shape preview thumbnail will show to the right of the Custom Shape Tool icon. The selection is greater and you can access even more shapes by clicking again on the small arrow on the right side of the panel. If you’re finding for banners, speech bubbles or arrows of all kinds, you have to take this tool.


7. Adjustment Layers
As you use the best photo editing software Photoshop for whatever purpose, like change colors of an image, improve the contrast or make it sharper, remember for all time use the adjustment layers. The large advantage of the adjustment layer is that you do not make the changes on the image itself but on a separate layer, so you can forever change the settings to see which adjustment works best for you. You will locate adjustment layers in the bottom of the Layers Panel {a black and white circle icon}.


Sharpen and improve your picture using Adjustment Layers
8. Layer Styles
This is a simple and easy way to add some pizzazz to your photo. Layer styles are special effects that can be rapidly applied to individual layers. All you have to do is double click on a layer and then decide the effect you like.
You can choose from a whole variety of features, add a stroke or a glow, drop a shadow, and much more with simply a click of the mouse. Be cautious you don not overdo it. These effects have a bent to appear low-cost and sleazy once there’s an excessive amount of them.
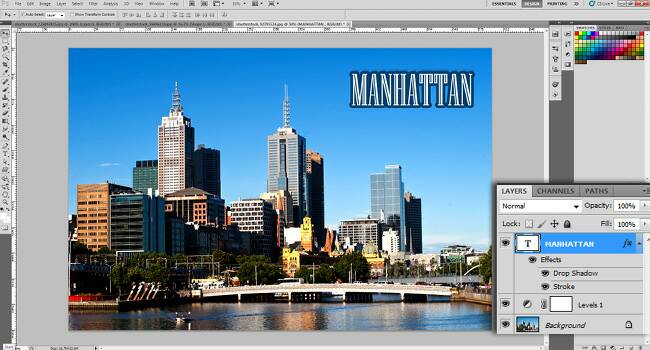
Easily add a stroke or drop a shadow on any text or object.
9. Spot Healing Brush
Yes, it is exactly like it sounds, spot healing brush tool will make everything look prettier! If you’ve a spot, blemish, or a mole spot healing brush tool will remove it instantly. This tool can also be used as a pimple remover. Just place the brush over the area you want to fix, confirm the brush is a bit bigger than the blemish and click. The best photo editing software Photoshop automatically samples from around the retouched area so you really do not need to do anything else.


Just simple click and the spot is gone
9. Dodge Tool
This tool lightens pixels where you use it. This is a best solution for red tired eyes. Set this tool to a soft brush, go to Range setting in the menu-bar’s pull down and choose highlights, set exposure on around 20%. Now carefully brush over the eye area. Remember do not overdo it, or your model will start to look like an Alien. A few easy strokes should do the job.

10. Blur Tool
An easy and delicate way to remove small wrinkles is to blur them a bit. Use the blur tool to smooth out small imperfections like the wrinkles around the eye or mouth area and simply blur them into the background. Again, be gentle and keep in mind that not to overdo it or instead of improving your image you’ll end up spoiling it. The Blur tool can be used for repair as well as more artistic purposes so it is important to become friendly with it.


Wow! What a helpful post!
ReplyDelete